Ever since I started modelling I have been looking for light and cheap - especially cheap, which is what an EeZeBiLt is all about. To this end, I used to haunt the back of the big furniture and electrical stores, and save packing material - big sheets of cardboard especially. The design below can be built from either cardboard or Correx - the latter being much smarter, wear resistant and expensive...
You need a large room, or a quiet bit of the garden, to cut an 8'x4' sheet of Correx. Luckily, it's very easy to draw on with a felt-tip and slice with a sharp knife. The main requirement when drawing is to take account of the space used up when a sheet is folded at right angles - it shifts the inside space back by the thickness of the material.
Remember to use washable non-permanent ink!
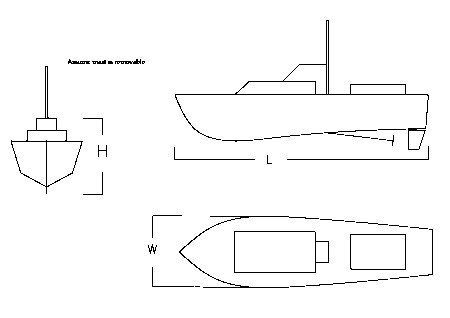
I size each box around a boat - which is hardly surprising! We first take the boat dimensions - Length, Width and Height (counting Height as from the tip of the propeller to the highest part of the superstructure).
Now we cut the bend lines. To do this we only cut one side of the material. Cutting WITH the flutes, a single slit is enough, as the material will then easily bend. It's a good idea not to cut the flap of the lid until the box is assembled, so it can be measured accurately against the final size.
Once cut, you use hot-melt glue to fix the bend in place. You need to bend the sections outwards slightly to get the hot glue in, but once it cools the bend is very solid...
And here is a single sheet laid out with the cutting lines on it. It's easy to cut straight lines WITH the flutes, but do check when going across them. Use a washable ink pen to prevent permanent marking.
It's also easy to cut this material!
The easy way to get a straight bend is to use a wooden batten to bend against.
Run a length of hot-melt glue all along the bend groove, then use the wood to hold it at right angles until it cools sufficiently to stay bent.
If you want to go down the Correx route, you will need some Correx. It's usually sold in large packs - you may be able to pick up a single sheet from a factory, but the last time I had some 4mm thick 'Correx -equivalent' delivered at �11 a sheet including carriage (min order 5) from here. The delivery was prompt, and we will use this for our demonstration. One advantage of a delivery is that you also get the two big sheets of cardboard that the Correx comes in...
Cutting a bend ACROSS the flutes is a bit different. When you bend across, all the edges of the flutes prevent a proper line developing. What you need to do is cut a groove in the material - a groove which is twice the thickness in width.
Here you see a knife starting to cut a groove, held at 45 degrees.
Boxing clever ....
The original EeZeBilts were small enough to sit on a shelf in a bedroom, and be carried to the local pond easily in one hand. But a lot of adults now seem to building them at double-size, and the 50+ series is also a bit cumbersome...
So I introduce the way in which I have stored and carried my boats - for about 25 years now, ever since I found the twin-wall fluted plastic material often called Correx, after the first product of its type on the market. But before that I had been using folded cardboard - a very similar product, with the major deficiency that it is not as waterproof as Correx (though a coat of paint can go some way towards helping that...).
This technique is hardly new, but the article might be of use to beginners wondering where to put a boat when it's not actually sailing...
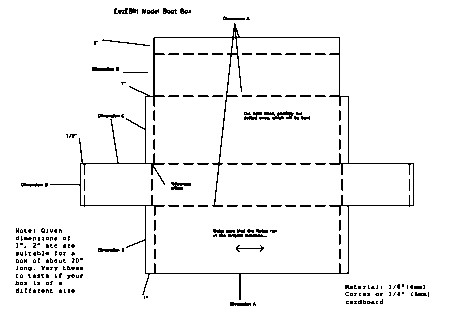
Now we add clearances. I usually expect the propeller to be 1" off the floor,to have 1" either side of the boat to put my fingers around it, and for the boat to have about 1/2" gap front and back. So we add those to the lengths we have, and get the following dimensions:
A = L + 1"
B = W + 2"
C = H + 2"
(giving 1" on top of the boat as well)
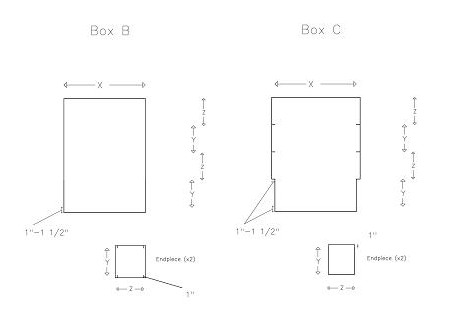
There are several ways to cut a pattern for a box.
You can cut it so that all you need to do is fold in the ends - easy to assemble, but this makes an irregular shape in the parent sheet, thus giving you some waste. Alternatively, you can make the box out of a middle and two ends - this uses the sheet most efficiently, but really demands that you use pop rivets to hold the ends on securely.
Then we add the thickness of the material.
Let us assume that the material is 1/8" thick. Then the dimensions become:
A = L + 1" + 1/4"
B = W + 2" + 1/4"
C = H = 2" + 1/4"
because each internal dimension is shorter by 2 thicknesses. This is really only important if you're trying to make something small, and size needs to be precise.
Note that if you want to put your radio, etc in the box as well you will need to make it longer or deeper. Print out the sketch above and transpose your lines onto your material...
Here I will show two boxes being made - one as a 'one-piece', and one with two seperate ends.
There are also a couple of ways of making ends. The plan drawings will indicate what I mean - and no doubt you can think of other variations. Click on them to get an A4 print to act as a 'check-sheet'...
You'll soon get the hang of not cutting all the way through! Practice on a bit of scrap. It doesn't matter if the groove edges are not too straight - the material will bend straight along the 'average' position...